Butterfinger Cake Balls
If there’s one thing that’s universally loved, it’s the combination of cake, chocolate, and Butterfingers. The irresistible appeal of these flavors comes together in the delightful Butterfinger Cake Balls. In this article, we’ll take you on a journey to create these delectable treats, step by step. But that’s not all – we’ll also explore the magic behind this recipe and provide answers to frequently asked questions.
Ingredients:
Before we dive into the details, let’s take a look at the ingredients you’ll need for making these delightful Butterfinger Cake Balls.
| INGREDIENT | QUANTITY |
|---|---|
| Yellow cake mix | 1 box |
| Chocolate frosting | 1 tub |
| Milk chocolate chips | 1 large bag |
| Butterfingers bars (crumbled) | 3-4 large bars |
Instructions:
Now that you have your ingredients ready, let’s walk through the step-by-step process of creating these scrumptious Butterfinger Cake Balls.
Step 1: Baking the Yellow Cake
- Start by baking the yellow cake mix according to the directions on the package.
Step 2: Crumbling the Cake
- Once the cake is mostly cooled, crumble it into a large bowl.
Step 3: Adding Chocolate Frosting
- Stir in the chocolate frosting until it’s completely combined with the crumbled cake, forming a dough-like consistency.
Step 4: Shaping the Cake Balls
- Roll the mixture into small balls for the cake balls.
- Insert toothpicks into each ball for easy dipping.
- Place the cake balls in the freezer for 1-2 hours to harden.
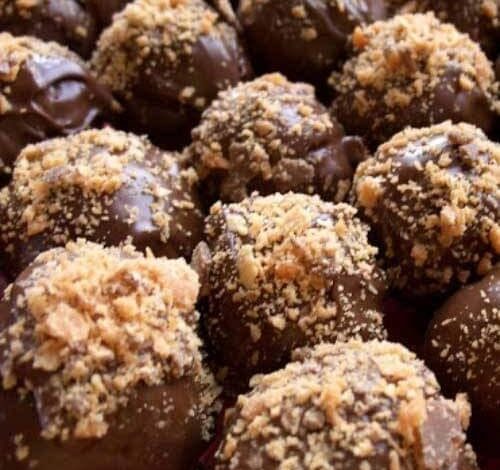
Step 5: Dipping in Chocolate
- Melt the milk chocolate chips.
- Dip the cake balls in the melted chocolate, ensuring they are well-coated.
- For an extra layer of goodness, dip the tops of the cake balls in crumbled Butterfingers.
- Place the coated cake balls on wax paper with the candy side down and let them dry for at least an hour.
Step 6: Enjoy!
Your Butterfinger Cake Balls are now ready to be savored. Share them with friends and family, or indulge in this sweet treat all by yourself.